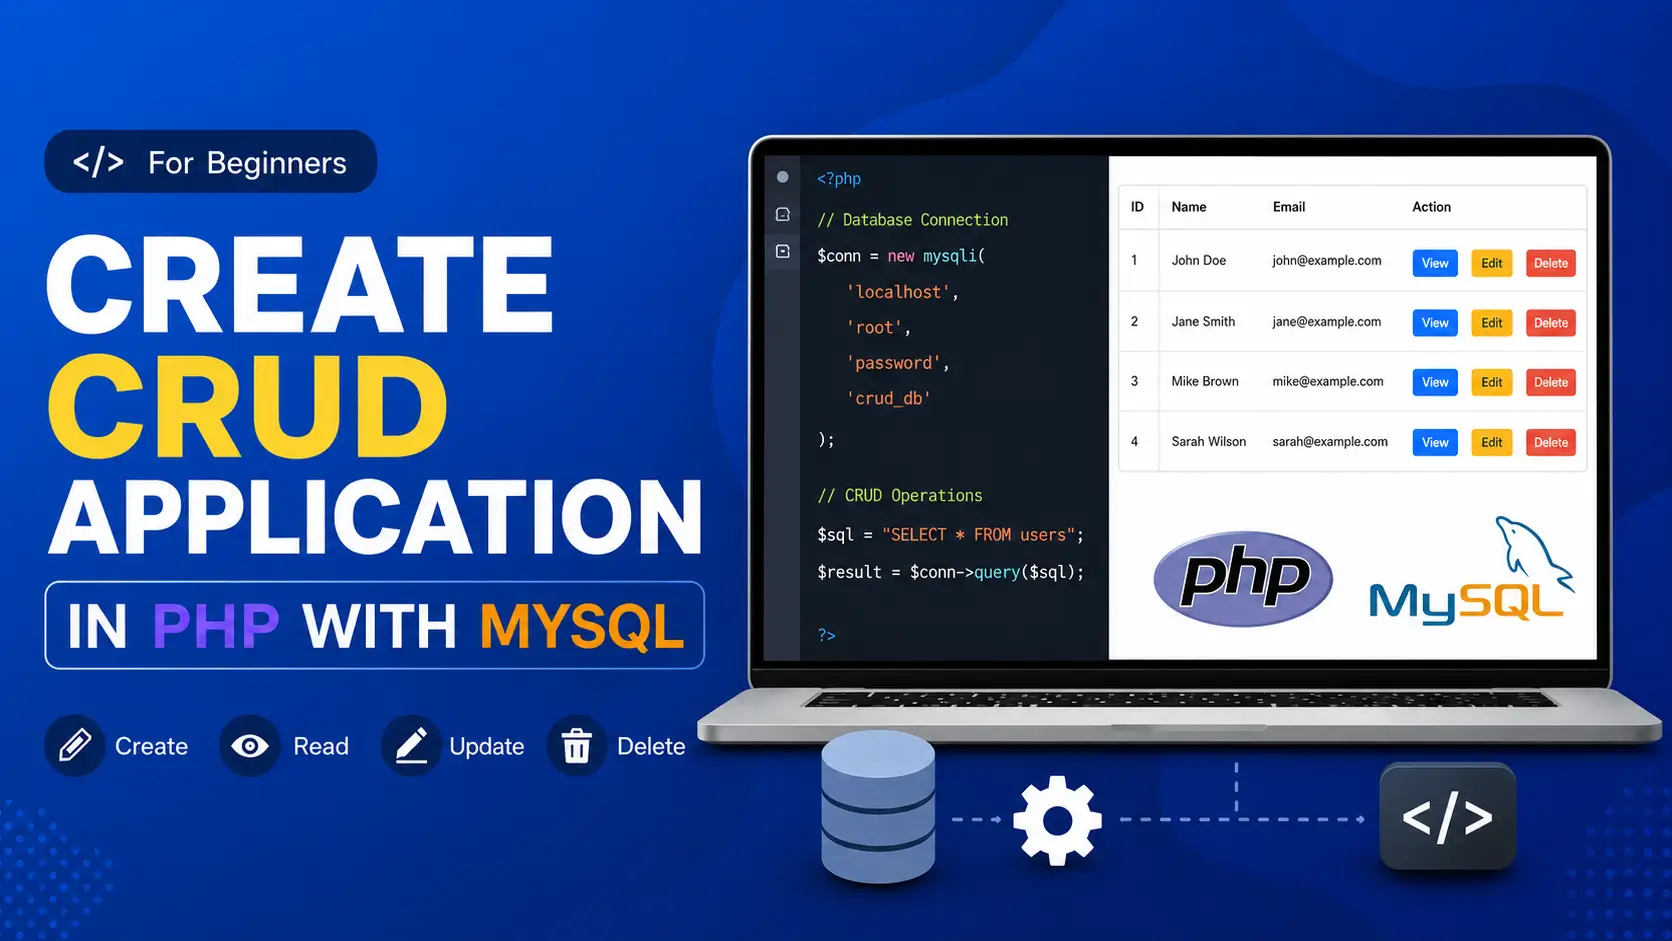
This article will help you learn how to create a simple and easy CRUD application in PHP using MySQL.
CRUD is an acronym for CREATE, READ, UPDATE, DELETE. We perform all these operations to manipulate the data in the database. Using PHP, we are going to create an application that performs all the CRUD operations.
Important Update: This popular tutorial has been completely refactored to meet modern security baselines. The implementation below now utilizes secure PDO (PHP Data Objects), prepared statements, and robust password hashing to prevent vulnerabilities like SQL injection.
To create and run our application, first, we need to set up our system with the following.
- Local Server:- XAMPP (That’s what we have used)
- Code Editor:- whichever you like ( we are using VS code)
Once you have all that set up, we can start working on our application.
Let’s first begin with our frontend
We have created a landing page( index.php ) to make our application look a bit professional.

<!-- Header -->
<?php include "header.php" ?>

<!-- body -->
<div class="container mt-5">
    <h1 class="text-center"> Welcome, Lets Create a PHP CRUD Application!</h1>
        <p class="text-center">
            We are going to use PHP and MySQL to create a CRUD (Create, Read, Update, Delete) Application.
        </p>
  <div class="container">
    <form action="includes/home.php" method="post">
        <div class="from-group text-center">
            <input type="submit" class="btn btn-primary mt-2" value="Let's Do it!">
        </div>
    </form>
  </div>
</div>

<!-- Footer -->
<?php include "footer.php" ?>
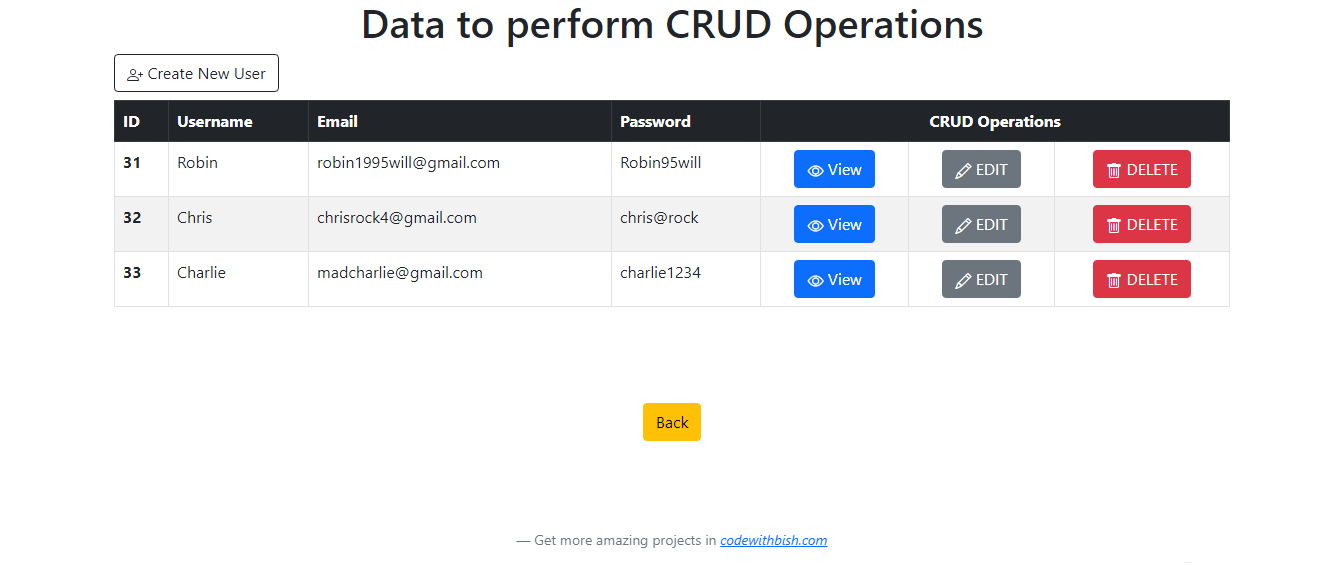
You can start with the homepage, displaying all our data records in a tabular format. All the data from our user’s table will have an action button on each record to perform the READ, UPDATE and DELETE operation. We will also add an “Add New User” button to CREATE a new user.
Create a folder named “includes”. Then create a file named home.php with the following code, and add it to the “includes” folder.
<!-- Header -->
<?php include "../header.php"?>

  <div class="container">
    <h1 class="text-center" >Data to perform CRUD Operations</h1>
      <a href="create.php" class='btn btn-outline-dark mb-2'> <i class="bi bi-person-plus"></i> Create New User</a>

      <!-- SEARCH FEATURE: A simple form that sends the search term via URL (GET method) -->
      <form action="" method="get" class="mb-3">
        <div class="input-group">
          <input type="text" name="search" class="form-control"
                 placeholder="Search by ID, Username, or Email..."
                 value="<?php echo htmlspecialchars($_GET['search'] ?? ''); ?>">
          <button type="submit" class="btn btn-primary">
            <i class="bi bi-search"></i> Search
          </button>
          <!-- 'Show All' link simply reloads home.php without any search parameter -->
          <a href="home.php" class="btn btn-outline-secondary">Show All</a>
        </div>
      </form>

        <table class="table table-striped table-bordered table-hover">
          <thead class="table-dark">
            <tr>
              <th  scope="col">ID</th>
              <th  scope="col">Username</th>
              <th  scope="col">Email</th>
              <th  scope="col" colspan="3" class="text-center">CRUD Operations</th>
            </tr>
          </thead>
            <tbody>
              <tr>

          <?php
            // Check if a search term was submitted
            $search = isset($_GET['search']) ? trim($_GET['search']) : '';

            if (!empty($search)) {
                // SEARCH QUERY: Use LIKE with % wildcards to find partial matches
                // The prepared statement keeps this safe from SQL injection
                $stmt = $pdo->prepare(
                    "SELECT id, username, email FROM users
                     WHERE id LIKE :search1
                     OR username LIKE :search2
                     OR email LIKE :search3"
                );
                // PDO requires unique placeholder names — we pass the same value for all three
                // The '%' symbols mean "match anything before or after the search term"
                $stmt->execute([
                    ':search1' => "%$search%",
                    ':search2' => "%$search%",
                    ':search3' => "%$search%",
                ]);
            } else {
                // No search term — show all users
                $stmt = $pdo->query("SELECT id, username, email FROM users");
            }

            // fetchAll() retrieves all rows into an array
            $users = $stmt->fetchAll();

            // Check if any results were found
            if (count($users) === 0) {
                echo "<tr><td colspan='6' class='text-center text-muted'>No users found.</td></tr>";
            }

            // Loop through each user to display their data
            foreach ($users as $row) {
              $id = $row['id'];
              // htmlspecialchars() converts special characters to HTML entities to prevent Cross-Site Scripting (XSS) attacks
              $user = htmlspecialchars($row['username']);
              $email = htmlspecialchars($row['email']);

              echo "<tr >";
              echo " <th scope='row' >{$id}</th>";
              echo " <td > {$user}</td>";
              echo " <td > {$email}</td>";
              // NO password column - never display password data, hashed or plain!

              echo " <td class='text-center'> <a href='view.php?user_id={$id}' class='btn btn-primary'> <i class='bi bi-eye'></i> View</a> </td>";
              echo " <td class='text-center' > <a href='update.php?edit&user_id={$id}' class='btn btn-secondary'><i class='bi bi-pencil'></i> EDIT</a> </td>";
              echo " <td  class='text-center'>  <a href='delete.php?delete={$id}' class='btn btn-danger'> <i class='bi bi-trash'></i> DELETE</a> </td>";
              echo " </tr> ";
            }
          ?>
              </tr>
            </tbody>
        </table>
  </div>

<!-- a BACK button to go to the index page -->
<div class="container text-center mt-5">
      <a href="../index.php" class="btn btn-warning mt-5"> Back </a>
    <div>

<!-- Footer -->
<?php include "../footer.php" ?>
Header And Footer File
We are also going to create common header and footer pages to add those to other pages when required and avoid rewriting the same code repeatedly.
So, create a file header.php and add the following code
<?php include "db.php" ?>
<!DOCTYPE html>
<html lang="en">
<head>
    <meta charset="UTF-8">
    <meta http-equiv="X-UA-Compatible" content="IE=edge">
    <meta name="viewport" content="width=device-width, initial-scale=1.0">

    <!-- Bootstrap CSS -->
    <link href="https://cdn.jsdelivr.net/npm/[email protected]/dist/css/bootstrap.min.css" rel="stylesheet" integrity="sha384-sRIl4kxILFvY47J16cr9ZwB07vP4J8+LH7qKQnuqkuIAvNWLzeN8tE5YBujZqJLB" crossorigin="anonymous">

    <!-- Bootstrap Icon -->
    <link rel="stylesheet" href="https://cdn.jsdelivr.net/npm/[email protected]/font/bootstrap-icons.min.css">
    <title>PHP CRUD System</title>
</head>
<body class="bg-light">

    <!-- Simple Navigation Bar -->
    <nav class="navbar navbar-dark bg-dark mb-4">
        <div class="container">
            <a class="navbar-brand" href="/index.php">
                <i class="bi bi-code-slash"></i> PHP CRUD Application
            </a>
        </div>
    </nav>

    <!-- Main Content Container -->
    <div class="container bg-white p-4 rounded shadow-sm">
Create a file footer.php and add the following code
<footer class="blockquote-footer fixed-bottom">Get more amazing projects in <cite title="Source Title"><a href="https://codewithbish.com/free-projects-download/" target="_blank">codewithbish.com</a></cite></footer>
    </div> <!-- End of Main Content Container from header.php -->

    <!-- Bootstrap JS (optional, for components like dropdowns, modals, etc) -->
    <script src="https://cdn.jsdelivr.net/npm/[email protected]/dist/js/bootstrap.bundle.min.js" integrity="sha384-YvpcrYf0tY3lHB60NNkmxc5s9fDVZLESaAA55NDzOxhy9GkcIdslK1eN7N6jIeHz" crossorigin="anonymous"></script>
</body>
</html>
Now, let’s set up our database
If you know your way around XAMPP, create a database “php_crud” and create a user table with four columns (ID, username, email, and password). Otherwise, you can execute a SQL query to create the table.
Creating the Database and User Table
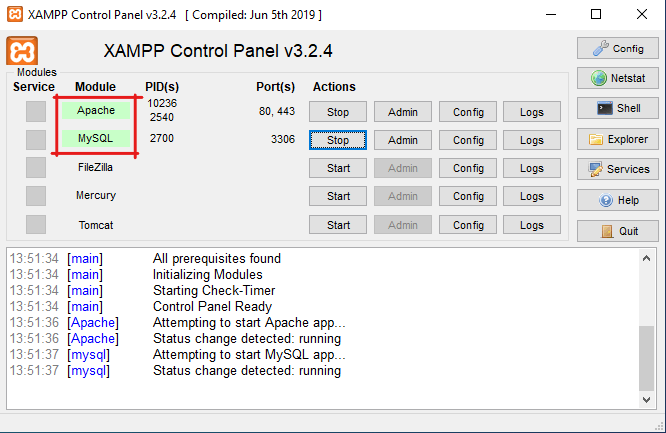
1. First, open the XAMPP server and start the 2 services ( Apache and MySQL).
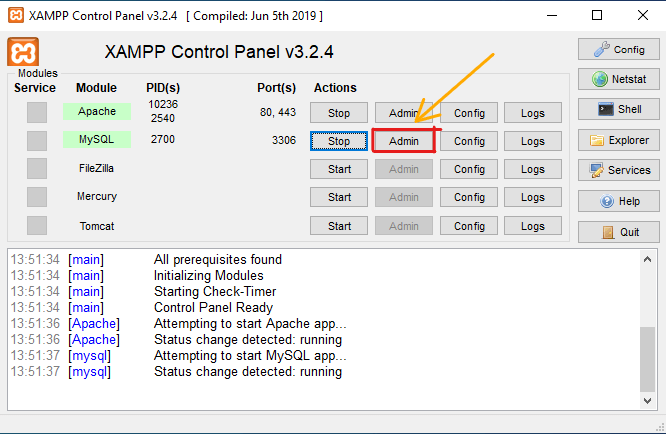
2. Then click on Admin, or you can type in the URL “localhost/phpmyadmin/”
3. Click on either “new” or “Databases,” and enter your database name ( we are using ‘php_crud’ ) and click Create.
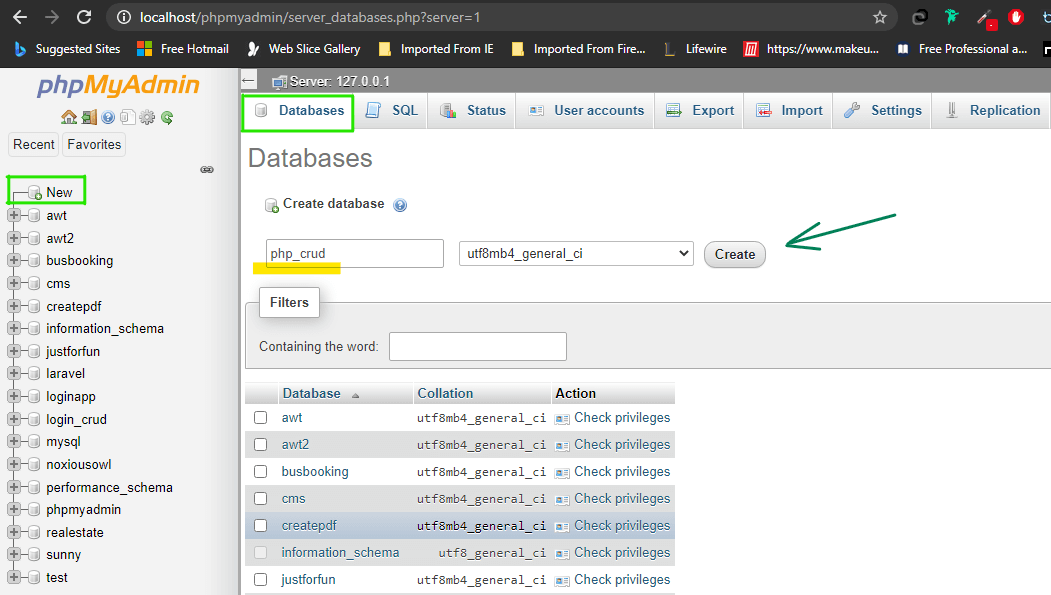
4. Now, click on “SQL,” enter the following code, and click “Go.”
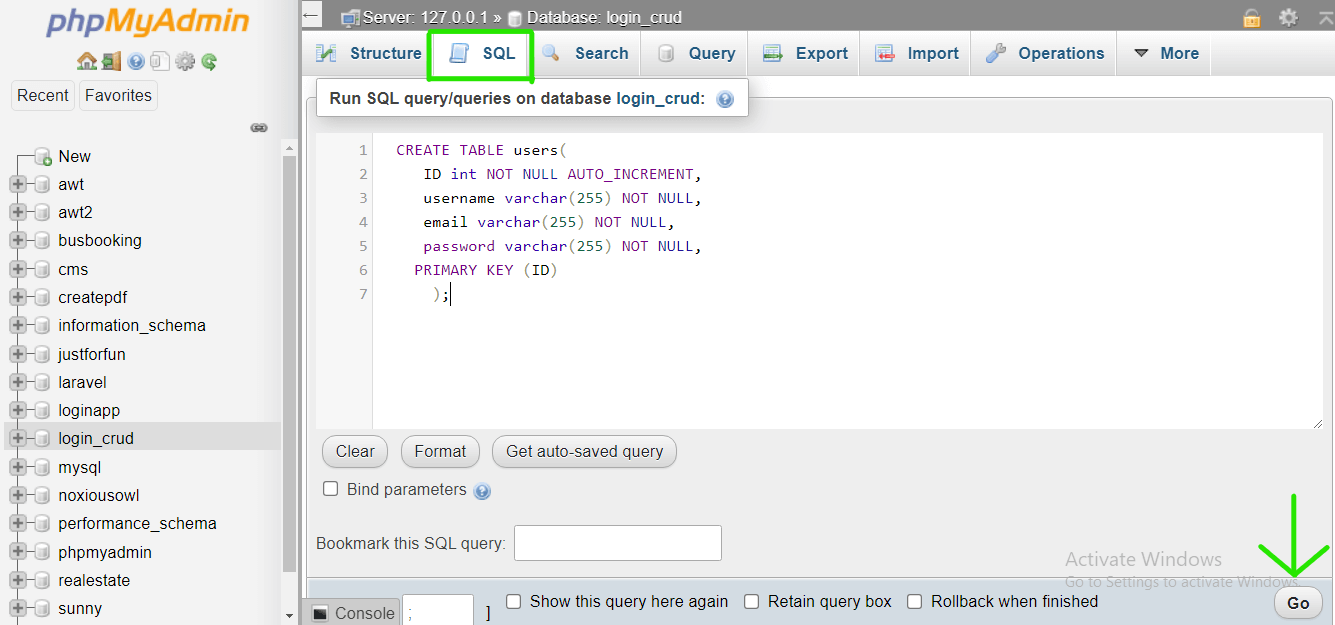
CREATE TABLE users(
    ID int NOT NULL AUTO_INCREMENT,
    username VARCHAR(255) NOT NULL,
    email VARCHAR(255) NOT NULL,
    password VARCHAR(255) NOT NULL,
   PRIMARY KEY (ID)
);
Now, Let’s Work on CRUD
Creating the Database Connection File
Now we are going to connect our MySQL database using a PHP script. Open your code editor, create a file db.php ( you can name it whatever you want ), and add the following code.
<?php

// Database configuration settings
$host    = 'localhost'; // The hostname or IP address of the database server
$db      = 'php_crud';  // name of the database
$user    = 'root';
$pass    = '';
$charset = 'utf8mb4';   // The character set to use, utf8mb4 supports a wider range of characters including emojis


// Data Source Name (DSN) - A string containing the required details to connect to the database
$dsn = "mysql:host=$host;dbname=$db;charset=$charset";


//configuration options for the PDO connection
$options = [
    // Ensure that PDO throws exceptions when database errors occur, making debugging easier
    PDO::ATTR_ERRMODE            => PDO::ERRMODE_EXCEPTION,

    // Define the default fetch mode to return an associative array (column names as keys)
    PDO::ATTR_DEFAULT_FETCH_MODE => PDO::FETCH_ASSOC,

    // Disable emulated prepared statements, forcing true prepared statements for better security against SQL injection
    PDO::ATTR_EMULATE_PREPARES   => false,
];


// Attempt to establish the database connection within a try-catch block
try {
    // Create a new PDO instance representing the connection to the database
    $pdo = new PDO($dsn, $user, $pass, $options);
}

catch (PDOException $e) {
    // If the connection fails, catch the PDOException and throw a new one with the error message
    throw new PDOException($e->getMessage(), (int) $e->getCode());
}
?>
“Don’t worry if you don’t understand every line of the database connection yet. This is the standard way to connect PHP to MySQL using PDO. We’ll focus on building the CRUD application first, and the connection code will become clearer as you learn more PHP.”
Modifications in the Database Connection File
- Replaced the Database Extension: Switched the database connection mechanism from mysqli (which was previously done) to PDO (PHP Data Objects).
- Configured Connection Properties: Set up the connection using variables for $host, $db, $user, $pass, and $charset.
- Set Up the DSN: Created a Data Source Name (DSN) string that securely constructs the connection details.
- Configured PDO Options: Defined strict PDO::ATTR_ options to enforce better security and error handling defaults.
- Wrapped in try-catch: The connection attempt is wrapped inside a try-catch block to handle PDOException errors during connection attempts.
Why Choose This Approach
- Database Agnosticism: Unlike mysqli, which is restricted to MySQL databases, PDO is a universal data-access abstraction layer. This allows you to use the same logic even if you migrate from MySQL to PostgreSQL or SQLite in the future.
- Improved Security: By setting PDO::ATTR_EMULATE_PREPARES => false, we explicitly tell PDO to use actual (native) prepared statements provided by the database server rather than emulating them in PHP. This is highly effective at preventing SQL injection attacks.
- Better Error Handling: Configured PDO::ATTR_ERRMODE => PDO::ERRMODE_EXCEPTION. This causes PDO to throw exceptions when database queries fail, making it easier to capture and debug failures rather than silently failing or throwing warnings.
- Easier Data Consumption: The PDO::ATTR_DEFAULT_FETCH_MODE => PDO::FETCH_ASSOC option automatically forces all our SQL query results to return as associative arrays, preventing the retrieval of duplicate numeric indexes (which saves memory) and keeping data mapping straightforward.
NOTE: If you have a different username, password, or database name, make sure you replace them with the correct credentials. For example, if you have created a different database name then replace php_crud with your database name.
Creating the Create Page
Let’s build the create function of our php CRUD application. Create a file create.php with the following code and add it into the “includes” folder. It will create a form for the user to insert details like name, email and save the input data into the users’ table.
<!-- Header -->
<?php  include "../header.php" ?>

<?php
  $error = '';   // Variable to hold error messages
  $success = ''; // Variable to hold success messages

  // Check if the form was submitted (the 'create' button was clicked)
  if(isset($_POST['create'])) {

        // Collect and clean input data using trim() to remove extra spaces
        $username = trim($_POST['user']);
        $email = trim($_POST['email']);
        $password = trim($_POST['pass']);

        // SERVER-SIDE VALIDATION: Check that no fields are empty before inserting
        // This prevents blank/null data from being saved to the database
        if (empty($username) || empty($email) || empty($password)) {
            $error = "All fields are required. Please fill in Username, Email, and Password.";
        } else {
            // Hash the password before saving it. NEVER save plain-text passwords!
            $hashed = password_hash($password, PASSWORD_DEFAULT);

            // Prepare an SQL statement using placeholders (:username, etc.) instead of direct variables.
            // This is crucial to prevent "SQL Injection" attacks.
            $stmt = $pdo->prepare(
                "INSERT INTO users (username, email, password) VALUES (:username, :email, :password)"
            );

            // Execute the prepared statement by providing the actual values for the placeholders
            $stmt->execute([
                ':username' => $username,
                ':email'    => $email,
                ':password' => $hashed,
            ]);

            $success = "User added successfully!";
        }
  }
?>

<h1 class="text-center">Add User details </h1>
  <div class="container">

    <!-- Show error message if validation failed -->
    <?php if (!empty($error)): ?>
      <div class="alert alert-danger" role="alert">
        <i class="bi bi-exclamation-triangle"></i> <?php echo $error; ?>
      </div>
    <?php endif; ?>

    <!-- Show success message if user was added -->
    <?php if (!empty($success)): ?>
      <div class="alert alert-success" role="alert">
        <i class="bi bi-check-circle"></i> <?php echo $success; ?>
      </div>
    <?php endif; ?>

    <form action="" method="post">
      <div class="form-group">
        <label for="user" class="form-label">Username</label>
        <input type="text" name="user"  class="form-control" required>
      </div>

      <div class="form-group">
        <label for="email" class="form-label">Email ID</label>
        <input type="email" name="email"  class="form-control" required>
      </div>

      <div class="form-group">
        <label for="pass" class="form-label">Password</label>
        <input type="password" name="pass"  class="form-control" required>
      </div>

      <div class="form-group">
        <input type="submit"  name="create" class="btn btn-primary mt-2" value="submit">
      </div>
    </form>
  </div>

   <!-- a BACK button to go to the home page -->
  <div class="container text-center mt-5">
    <a href="home.php" class="btn btn-warning mt-5"> Back </a>
  <div>

<!-- Footer -->
<?php include "../footer.php" ?>
Creating the Read Page
Now that we have some data in our table, let’s build the read function of our php CRUD application. Create a read.php file with the following code and add it into the “includes” folder. It will retrieve and show the data that we have stored in our table based on the ID attribute of the user.
<!-- Header -->
<?php  include '../header.php'?>

<h1 class="text-center">User Details</h1>
  <div class="container">
    <table class="table table-striped table-bordered table-hover">
      <thead class="table-dark">
        <tr>
          <th  scope="col" >ID</th>
          <th  scope="col">Username</th>
          <th  scope="col">Email</th>
        </tr>
      </thead>
        <tbody>
          <tr>

            <?php
              //  first we check using 'isset() function if the variable is set or not'

              //Processing form data when form is submitted
              if (isset($_GET['user_id'])) {
                  $userid = $_GET['user_id'];

                  // Use prepared statements to prevent SQL injection when fetching by ID
                  $stmt = $pdo->prepare("SELECT id, username, email FROM users WHERE id = :id");
                  $stmt->execute([':id' => $userid]);

                  // fetch() retrieves a single row
                  while ($row = $stmt->fetch()) {
                      $id = $row['id'];
                      // Apply htmlspecialchars() to prevent XSS (Cross-Site Scripting)
                      $user = htmlspecialchars($row['username']);
                      $email = htmlspecialchars($row['email']);

                      echo "<tr >";
                      echo " <td >{$id}</td>";
                      echo " <td > {$user}</td>";
                      echo " <td > {$email}</td>";
                      // Password column intentionally removed for security
                      echo " </tr> ";
                  }
                }
            ?>
          </tr>
        </tbody>
    </table>
  </div>

   <!-- a BACK Button to go to pervious page -->
  <div class="container text-center mt-5">
    <a href="home.php" class="btn btn-warning mt-5"> Back </a>
  <div>

<!-- Footer -->
<?php include "../footer.php" ?>
Creating the Update Page
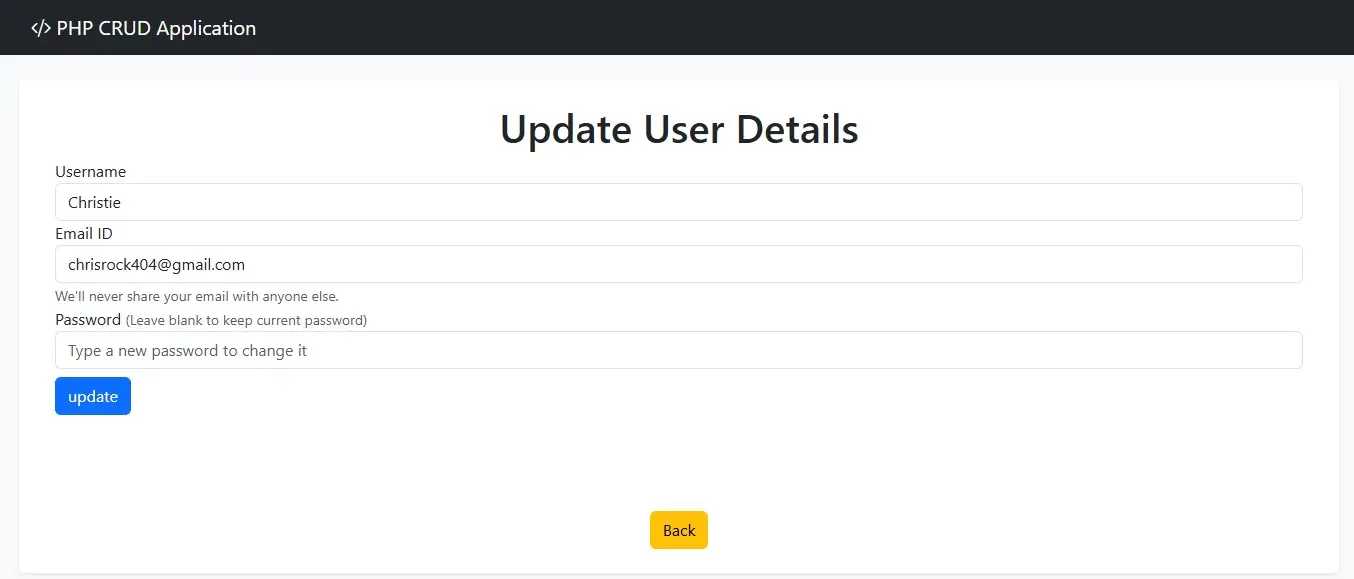
Now let’s build the update function of our php CRUD application. Create a update.php file with the following code and add it into the “includes” folder.
It will retrieve the data that we have stored in our table based on the ID attribute of the user and show it in the form, from which we can update the data and save it back to the users’ table.
<!-- Footer -->
<?php include "../header.php"?>

<?php
   $error = '';   // Variable to hold error messages
   $success = ''; // Variable to hold success messages

   // checking if the variable is set or not and if set adding the set data value to variable userid

   if(isset($_GET['user_id']))
    {
      $userid = $_GET['user_id'];
    }

      // Securely fetch user data using PDO prepared statements
      $stmt = $pdo->prepare("SELECT id, username, email FROM users WHERE id = :id");
      $stmt->execute([':id' => $userid]);

      if ($row = $stmt->fetch()) {
          $id = $row['id'];

          // Use htmlspecialchars() to prevent Cross-Site Scripting (XSS)
          $user = htmlspecialchars($row['username']);
          $email = htmlspecialchars($row['email']);
          // We NO LONGER fetch the password here. Passwords should never be pre-filled in forms!
      }

    // Processing form data when the form is submitted
    if (isset($_POST['update'])) {

        // Clean up the username and email inputs
        $username = trim($_POST['user']);
        $email    = trim($_POST['email']);

        // SERVER-SIDE VALIDATION: Check that username and email are not empty

        // Password is optional on update (user may want to keep their current password)
        if (empty($username) || empty($email)) {
            $error = "Username and Email are required. Please fill in both fields.";
        } else {

            // Check if the user typed a new password into the input box
            if (!empty($_POST['pass'])) {
                // Hash the newly typed password before saving it to the database
                $hashed = password_hash($_POST['pass'], PASSWORD_DEFAULT);

                // Prepare an UPDATE statement that includes the new password
                $stmt = $pdo->prepare(
                    "UPDATE users SET username = :username, email = :email, password = :password WHERE id = :id"
                );

                $stmt->execute([':username' => $username, ':email' => $email, ':password' => $hashed, ':id' => $userid]);
            } else {

                // If the password field was left completely blank, we only update the username and email
                $stmt = $pdo->prepare("UPDATE users SET username = :username, email = :email WHERE id = :id");
                $stmt->execute([':username' => $username, ':email' => $email, ':id' => $userid]);
            }

            $success = "User data updated successfully!";

            // Update variables so the new data reflects immediately on the form below
            $user = htmlspecialchars($username);
            $email = htmlspecialchars($email);
        }
    }
?>

<h1 class="text-center">Update User Details</h1>
  <div class="container ">

    // Show error message if validation failed
    <?php if (!empty($error)): ?>
      <div class="alert alert-danger" role="alert">
        <i class="bi bi-exclamation-triangle"></i> <?php echo $error; ?>
      </div>
    <?php endif; ?>

    // Show success message if update was successful
    <?php if (!empty($success)): ?>
      <div class="alert alert-success" role="alert">
        <i class="bi bi-check-circle"></i> <?php echo $success; ?>
      </div>
    <?php endif; ?>

    <form action="" method="post">
      <div class="form-group">
        <label for="user" >Username</label>
        <input type="text" name="user" class="form-control" value="<?php echo $user  ?>" required>
      </div>

      <div class="form-group">
        <label for="email" >Email ID</label>
        <input type="text" name="email"  class="form-control" value="<?php echo $email  ?>" required>
      </div>
        <small id="emailHelp" class="form-text text-muted">We'll never share your email with anyone else.</small>

      <div class="form-group">
        <label for="pass" >Password <small class="text-muted">(Leave blank to keep current password)</small></label>
        <input type="password" name="pass"  class="form-control" placeholder="Type a new password to change it">
      </div>

      <div class="form-group">
         <input type="submit"  name="update" class="btn btn-primary mt-2" value="update">
      </div>
    </form>
  </div>

    // a BACK button to go to the home page
    <div class="container text-center mt-5">
      <a href="home.php" class="btn btn-warning mt-5"> Back </a>
    <div>

<!-- Footer -->
<?php include "../footer.php" ?>
What We Changed
Stopped Pre-filling the Password Field: In the original code, the <input> tag for the password had a value=”<?php echo $pass ?>” attribute. We completely removed this and stopped fetching the password from the database when the page loads. Instead, we added a placeholder saying “Type a new password to change it”.
Added Conditional Password Updating: In the form processing logic, we wrapped the password hashing and updating inside an if (!empty($_POST[‘pass’])) block.
If they did type a new password, it gets hashed and updated.
If they didn’t type a new password (else), we run a different SQL query that only updates the username and email, leaving the password completely untouched.
Upgraded to PDO and Prepared Statements: Just like the create.php page, we upgraded the raw SQL queries to use secure PDO placeholders (:username, :email, etc.).
Kept Form Values Updated: After the update runs, we instantly update the $user and $email variables so that the HTML form inputs refresh to show the newly saved data.
Why Choose This Approach
Never Show Hashed Passwords: Putting a hashed password (which is 60+ random characters) into an input box looks incredibly confusing to a user. It also technically exposes the hash, which is a security risk. It’s much cleaner to just leave the password box empty.
Preventing Password Overwrites: If a user only wants to update their email address, they shouldn’t be forced to type in a new password. If you didn’t have this if/else logic, submitting the form with an empty password box would literally overwrite their database password with a hash of a blank space (or a hash of nothing), locking them out of their account! This conditional logic is standard practice in web development to solve that exact problem.
Better Security: By upgrading the SQL statements to use PDO and htmlspecialchars(), we ensured that update.php is just as protected against SQL Injection and XSS attacks as the rest of the application.
Why did we add Validation? (The Empty Data Problem)
You might notice that in our create.php and update.php files, we added a small block of code to check if the fields are empty:
// SERVER-SIDE VALIDATION
if (empty($username) || empty($email) || empty($password)) {
    $error = "All fields are required.";
}
Why did we do this? Originally, if a user clicked the “Submit” button without typing anything into the input boxes, the form would still process. It would send empty or “null” data to the database, resulting in blank rows! This is a common bug when first learning PHP.
To fix this, we added Server-Side Validation. Before our code attempts to run the INSERT or UPDATE SQL queries, it uses PHP’s empty() function to check if the user actually provided the required information. If any field is blank, we display an alert warning the user, and we stop the database from saving empty data.
We also added the required attribute directly to the HTML input tags as a quick first line of defense!
Creating the Delete Page
Finally, we can build the delete function of our php CRUD application. Create a delete.php file with the following code and add it into the “includes” folder.
It will delete the data we have stored in our table based on the user’s ID.
 <!-- Footer -->
<?php  include "../header.php" ?>

<?php
     // Check if the 'delete' variable is present in the URL (e.g., delete.php?delete=5)
     if (isset($_GET['delete'])) {

         // Securely delete the user using a PDO prepared statement to prevent SQL Injection
         $stmt = $pdo->prepare("DELETE FROM users WHERE id = :id");

         // Execute the query by binding the ID from the URL to our :id placeholder
         $stmt->execute([':id' => $_GET['delete']]);

         // Redirect the user back to the home page immediately after deletion
         header("Location: home.php");

         // CRITICAL: Always call exit; after a header redirect to stop the script completely.
         // If you forget this, a hacker could ignore the redirect and force the rest of the page to execute!
         exit;
     }
              ?>

  <!-- Footer -->
<?php include "footer.php" ?>
What We Did
Replaced the Delete Logic: We completely removed the old mysqli_query statement.
Added PDO Prepared Statements: We changed the SQL logic to use a prepared statement (DELETE FROM users WHERE id = :id) and bound the ID directly from the URL ($_GET[‘delete’]) using $stmt->execute().
Added the Missing exit;: After the header(“Location: home.php”); statement, we explicitly added the exit; command.
Why Choose This Approach
Securing the Delete Query (Preventing SQLi): In the original code, taking the ID directly from the URL (?delete=5) and tossing it straight into the SQL query is highly dangerous. A hacker could change the URL to ?delete=5 OR 1=1 and potentially delete your entire database! By using PDO prepared statements (:id), the database treats the URL input as pure text, totally neutralizing the attack.
The Critical Importance of exit;: This is one of the most common beginner mistakes in PHP! When you use header(“Location: home.php”);, you are just asking the user’s browser to go to another page. However, the PHP script on the server does NOT stop running.
- If a malicious user uses a tool that ignores headers, they could force the PHP code below the redirect to execute anyway.
- Calling exit; (or die();) immediately after the header acts as a hard-stop for the server, ensuring that no other code on the page is processed. It’s a tiny, one-word security upgrade that is absolutely mandatory for redirects!
That’s it! You’re all set!
You now know how to create a PHP CRUD Application with MySQL.
We hope this article helps you understand how to create a CRUD application using PHP and MySQL. If you find it helpful, don’t forget to share this article with your friends.
If you find any mistakes or something didn’t work out quite right, do let us know. Thank you for reading!
Bonus: Adding a Search Feature
Once you have your CRUD application working, a great next step is allowing users to search through the data! Thanks to a great suggestion from a reader, we’ve added a simple search bar to the home.php page.
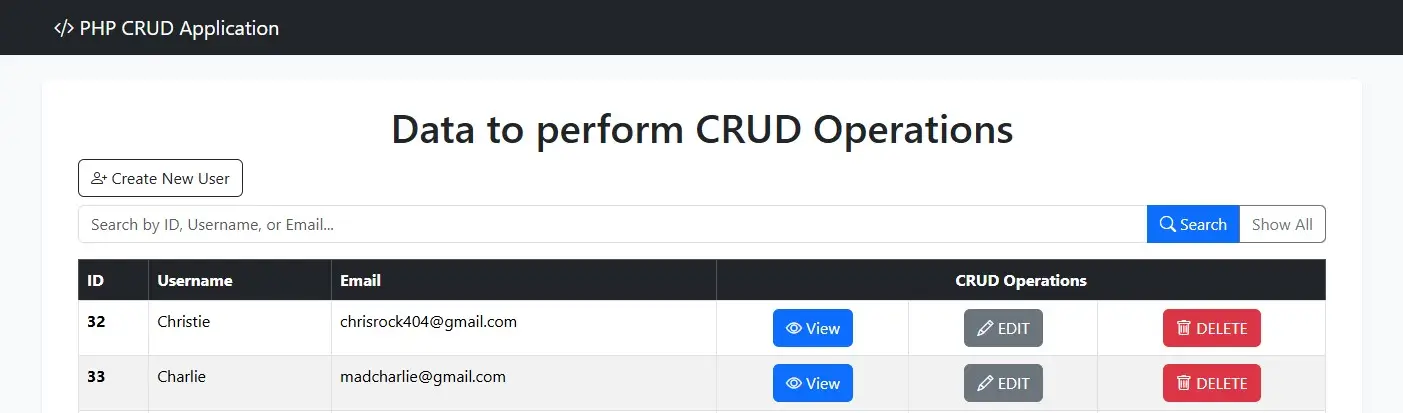
Here is how we built a simple, beginner-friendly search feature without needing any complicated JavaScript or AJAX!
1. The Search Form (HTML)
First, we added a simple HTML form right above our table in home.php.
<!-- SEARCH FEATURE: A simple form that sends the search term via URL (GET method) -->
<form action="" method="get" class="mb-3">
  <div class="input-group">
    <input type="text" name="search" class="form-control" placeholder="Search by ID, Username, or Email...">
    <button type="submit" class="btn btn-primary">Search</button>
    <a href="home.php" class="btn btn-outline-secondary">Show All</a>
  </div>
</form>
Key takeaways:
- We used
method="get". UnlikePOST(which hides data in the background),GETputs the search term right in the URL (e.g.,home.php?search=Robin). This makes it easy to share search results or bookmark them! - The
Show Allbutton is just a simple link back tohome.phpwith no search term attached, which effectively clears the search.
2. The Search Logic (PHP & SQL)
Next, we modified the PHP code that fetches our users from the database. We need it to check if a user searched for something, and if so, filter the results using SQL’s LIKE operator.
// Check if a search term was submitted in the URL
$search = isset($_GET['search']) ? trim($_GET['search']) : '';

if (!empty($search)) {
    // SEARCH QUERY: Use LIKE with % wildcards to find partial matches
    $stmt = $pdo->prepare(
    "SELECT id, username, email FROM users
     WHERE id      LIKE :search1
     OR username   LIKE :search2
     OR email      LIKE :search3"
);

// PDO requires unique placeholder names — we pass the same value for all three
$stmt->execute([
    ':search1' => "%$search%",
    ':search2' => "%$search%",
    ':search3' => "%$search%",
]);

} else {
    // No search term — show all users
    $stmt = $pdo->query("SELECT id, username, email FROM users");
}

$users = $stmt->fetchAll();
How it works:
- We check the
$_GETarray to see if a search term exists. - If a search term exists, we use an SQL
WHEREclause combined withLIKE. - We wrap the search term in
%symbols (like%$search%). In SQL,%is a wildcard. It tells the database: “Find this text anywhere in the column, whether it’s at the beginning, middle, or end!” - We use Prepared Statements (
$pdo->prepare()) to pass the search term securely, ensuring our search bar is completely safe from SQL injection attacks.
Important note: PDO requires every placeholder to have a unique name — so even though all three columns search for the same value, we name them:search1,:search2, and:search3separately. Using the same name (:search) three times will cause an error!.
And that’s it! You now have a fully functional, secure search bar added to your CRUD app.


Sir I need search Button to search my Id, user name, Any of us you type means it will show on grid. Please send me that source code. I am ur subscriber
Hi Praveen, thanks for the suggestion! I’ve added a simple search feature to the project. There’s now a search bar on the home page where you can type an ID, username, or email — it will filter the table and show only matching results. There’s also a “Show All” button to reset the search. Check out the updated code!
This code stores empty data or null data in database. I think there would be a problem in add
-user part. So recheck the code do the necessary modifications.
Hi Suryaram, Thanks for pointing this out! You’re absolutely right — the original code didn’t have any validation, so submitting the form with empty fields would insert blank rows into the database. I’ve updated the code to fix this. The create.php now checks if username, email, and password are empty using PHP’s empty() function before inserting. I’ve also added the HTML required attribute to the input fields as an extra layer of protection.